Tuesday, June 16, 2015

Garden Salsa Three Ways

 
   This garden season has been a tough on; heavy rains and flooding followed by heat and humidity. Needless to say, the tomatoes are stressed. Fortunately our education gardens are all raised beds, offering a bit of help- their harvests this week have been impressive. Since some have managed to survive long enough to ripen, it's salsa time!  
   There are two main ways I make salsa at home: stove top and oven roasted. What's the difference? The flavor. Stove top salsas are delicious, simple and quite delicious- with the added bonus of not heating the oven. Oven roasted salsa is distinctly different- enhancing the natural qualities of the fruits and drawing a caramelized yummy-ness that's hard to beat. 

Simply Salsa- Stove Top

10 cups chopped tomatoes
5 cups chopped green peppers
5 cups chopped onions
2 1/2 cup chopped hot peppers 
(such as jalapeno)
1 1/2 cup lime juice or vinegar
3 cloves garlic, minced
3 teaspoons salt

In a large heavy bottom pot, stir all together mixing very well. Cook over medium heat until the color deepens and the juices thicken (about 30 minutes). Ladle into pint jars (approximately 6) leaving 1/2 inch head space. Process in water bath. 15 minutes. Hint: a food processor is a wonderful friend:)

Simply Roasted Salsa

12 Roma-style tomatoes, halved
3 cloves garlic, peeled
2 large onions, quartered
5 hot peppers
olive oil
salt
1 lime

Spread tomatoes, garlic and peppers on a large baking sheet. Drizzle with olive oil and salt modestly. Roast at 425 degrees for 20 minutes or until the onions start to caramelize.
Once cool enough to touch, peel skin off tomatoes before pulsing them in a food processor (with peppers, onion and garlic). Add juice and zest of one lime..stir well before ladling into pint jars (about 3). Process in water bath 15 minutes.

   If you are really in a pinch, or if you are cooking with kids, fresh salsa is a snap! I generally use the food processor to get things done quickly. Bear in mind, this can start to 'juice' as it sets- you may want to strain it a bit.

Salsa Fresca (fresh salsa)

5 medium tomatoes
1/4 an onion
2 hot peppers
3 cloves garlic
1 lime
salt and pepper

Seed and chop your tomatoes. Rough chop the onion, peppers and garlic *remove pepper seeds for a milder salsa. Toss them in a food processor, pulsing to incorporate to desired consistency. Juice and zest the lime and stir into salsa with the salt and pepper. Keep refrigerated if you have any left!
Note: this recipe is from Food Heros

A few notes:
- pepper seeds and veins hold the heat- remove for milder salsa
- pepper size also effects heat- larger ones are milder
- green tomatoes can be used, preferably in the cooked versions
- a blender also works for processing the salsas, as does a food mill
- salsa is a great dose of nutrition so put it on everything!

Now grab your favorite tortilla chips or a hearty "Mexican-style" dish and dig in!

Wednesday, June 10, 2015

Nutrition- It's Not About Celery Sticks


Image result for image of celery sticks
Large groups of teenagers can be daunting- especially if your might be an unpopular activity in their summer schedule! In a moment of hushed bluntness, a young man's comment caught my attention, "Great, celery sticks and ranch". Ouch! 

His comment stirred an immediate reaction in me- of gratitude! I have been brooding and fretting over a few crazy me ideas (you know, the ones that only sound good in your own head)- in attempts to put together a fresh summer teen nutrition/ag program. One dealt with none other than nutrition myths, such as 'nutrition is all about celery'.

Without fear I walked right up to the boy, who was quite strong in his defense of his comment- and quite clear he would not be eating any celery, and thanked him for his honesty. Our small one-on-one conversation gave me an open door to assure him this would not be a boring activity, but an opportunity to change his outlook. He challenged me further with a smirk and an agreement to give it a shot. My long ride home found me in 'all tabs open' mode as the creative juices struggled to marry with sound fact and reasoning.

If nutrition is not about the celery sticks, what is it about? 

1. Food, not food shaming! Learning about food, both natural and processed, in order to equip you for your choices.

2. Choices. What goes in to your body is your choice- but be sure you are informed and educated in order to make good ones.

3. Be where you are. Children/youth generally do not make food purchasing decisions for their families, so there are limits to what they can choose. Family finances, ethnic preferences, and food knowledge can also play a role. Work with what you have and learn to make it work.

4. Trying new things- not just new foods. Sometimes nutrition is about trying new skills, or new ways to use certain foods.

And finally- 
5. Fit your tastes! Each of us are different- and our tastes are too. Learn to adjust foods to suit your tastes; you will be more willing to eat them and make them yourselves.

I have no doubt this summer will be full of challenging personalities and hard set preferences- most kids have rather firm views of food and nutrition. My hope is that this young man's honesty will truly open the flood gates to the many jumbled notions in my head and bring them to an engaging plan of action! 

Tuesday, June 9, 2015

Engaging the Mind- Miss K and Me

Miss K: pint size bundle of energy, ingenuity, and noise. Let me just say, this grandmama sees an awful lot of her mama, aunt and uncle in this little firecracker! Weekends with her are fun, fast, and fascinating- it keeps me on my toes!

Like any tot she has always been curious and engaging- focused eye contact and gurgly noises. Growing into the mobile, interactive, tot she now is offers even more insight into the curious mind of this little lady.

As I prepared for another visit from our little tot, I found it a great time to share specific examples of how I strive to engage the mind and allow a child to find self expression and self soothing. Let's start at the beginning.

Baby K
She was around three months old when she first started really spending time with me. One of her favorite soothing activities was a walk outside. Her face would light up as she gazed all around her: blue sky, green trees, the flower and veggie gardens.. farm animals and the noises of farm life.

Touching different textures was another engaging activity she loved: soft toys, rough books- tough and feel books are her favorite. Reading and music were calming- it amazed me how long she would let me read to her.

As she grew, we put paint on paper and placed it inside a zip bag, allowing her to poke, smear, and play at painting without too much mess. Water play- scooping, funneling, pouring- and soil exploration- getting down in the dirt and feeling it- were things she grew into.


Miss K today
At the start of her sitting up time to now, she loves fabric textures and colors; patterns are something she tends to notice and follow. Sitting on the floor with fabric and yarn offer her textile touch and interaction with creative opportunity; make a blanket, a fort, or wrap a doll in it.
Outdoors is still number one: the animals, trees and garden are always visited shortly after she arrives. Petting, smelling, hugging- touching, digging, and gazing- all offer her moments of exploration and engagement.

Painting is her indoor favorite- now with brush in hand. Watercolors are top request; dipping the brush, swirling and swoohing it in paint and paper are times of determined concentration and intense focus.

Reading and music are excellent calming activities for her. She could hear a story over and over for half an hour- and dance and sing as well.

So what does it matter?
A creative mind is a terrible thing to waste- and every mind is creative. The key is to expose them to various outlets of creativity and allow them the freedom to find the avenue best suited to their needs. If Miss K is a bit fussy, she now asks to go outside or to paint- whether she realizes it or not, she is already using self calming activities. Children need outlets to express themselves and deal with the frustrations/emotions which are simply a part of their natural growing experience.

Today's encouragement:
Let's do a little self exploration. What do you do to calm your frazzled mind?
Share your experiences, tips, and questions- inspire each other!

Monday, June 8, 2015

Engage the Mind- Open The Door!

Children are naturally inquisitive, creative, and eager to explore the amazing messiness life offers. This can be a source of frustration for many new parents- after all, these little bundles of energy are exhausting! So what is a mama/grandmama/caregiver to do? Engage the mind!

Okay, but what does that mean? In my home, engaging the mind means opening the door to creative opportunities though exposure and modeling. If I come inside from our 'outdoor play' and need to cool down, maybe I get some paints out and allow myself time to let my mind relax. Maybe we get out fabric/textiles and drape them over the chairs or lay them on the floor and explore the textures, colors, and different ways we can play with them.

In my years of raising children and teaching children, it has become vividly clear that children given opportunities/exposure to art, music, textile and nature are calmer, engaged, vocal, and easily take to the tasks ahead of them. When we open these opportunities we activate areas of the mind that can be opened by no other means. That isn't all.

Children learn self-soothing/self-calming when they learn to engage their mind, body, and energy in various expressive activities. Articles abound on the positive effect of nature on a child's behavior and emotional well being. Further still, articles are popping up daily reminding us that artistic/musical expression improves children's reading, writing and math scores.

The down side of this? It takes work. It's messy. It may be something we ourselves were not naturally exposed to, making it hard to initiate. Depending on your method and current supply cabinet, it may require a little investment.

So, when do we start? Now! Never too early or too late. Infants can go outdoors- walks, swings, and simply sitting give them opportunity to look around and engage their senses. Toddlers love getting their hands in paint, fabric, and soil- walking and touching in nature and listening/moving to music. Older children may resist at first, but when given freedom to do it their way on their terms they often find an outlet that fits their personality.

Today I encourage you- whether with your child, your grandchild, students, or even for yourself- take a moment and truly listen to music, splatter paint on a paper, walk through nature. Engage.

Share your experiences, tips, and questions!

Saturday, June 6, 2015

Small Batch Canning- Let's Investigate

Time is short and harvests are unpredictable... I hear this all the time- which is why I love my flex-recipes (my recipes that offer ratio based cooking and preserving). When I saw books coming out offering small batch preserving recipes and information I was thrilled!

When asking a class full of newbie canners what their biggest hesitation is about canning, the most common responses are 1. Fear- the process scares them, 2. Time- canning takes all day! Small batch canning offers a small taste of preserving without the labor intensive canning days. The fact you only preserved a few small jars also helps those afraid of bacteria/illness that can come from long term storage.

Last summer I purchased two books: Preserving by the Pint and Food in Jars both by Marissa McClellan (who also has a blog titled Food in Jars). I have read, studied, compared, and compiled several traditional to small batch recipes from time tested sights/books and the new small batch books. It has been a great deal of fun and furious work to see how the smaller batches stack up with traditional preserving.
Here are a few of my notes:
1. All small batch is water bath canned. This is important because, while it is less labor intensive, it is also limiting. Water bath preserved foods must be high acid foods (picked/tomato sauces or jams/jellies.
2. Conventional canner not required. Small batches simply need a heavy bottom pot with a tight fitting lid. The catch is- you need a wire basket/rack or a dish towel in the bottom to prevent jars from direct contact/rattling with the bottom of the pot.
3. First timers love it. Many novice canners like the low commitment level and the ability to test run the recipes before diving into large canning recipes. Yes, I have actually tested this with newbies.
4. It fits perfect with square foot garden methods. Since I teach gardening, and square foot is the new backyard/school yard favorite garden method, small batch preserving is perfect.
5. It's limiting. Many new canners are interested because they want canned green beans and carrots like grandma had sitting on the pantry shelves. You can only pickle or brine pack them in small batch, water bath canned recipes. Low acid veggies must be pressure canned- currently there is no easy way to do that- and no small batch method.

So, after a year of small batch investigation do I recommend it? Yes, especially if you are hesitant or new to canning. Small space gardeners, farmers market shoppers and hand made gifters will enjoy the low pressure, time friendly method.
Is it expensive? No. Many canning class students get disheartened by the 'start up expense' involved in canning. While you will need to buy jars and lids, only a few are needed. Since you do not need a canner, the only expense will be if you do not already have a pot to use.
What about shelf life/bacteria? Follow directions and you should be fine. Canning times are important to follow because that is the 'safe zone' for killing bacteria and sealing the lids. Shelf life is also included in the recipes (generally 6 months to a year), but with only a few jars you most likely won't have them on the shelf that long.
Can I adjust to my taste? Tricky question. Recipes that are water bath canned require a high acidity/PH so, example, if you add more garlic or onion to your salsa you have lowered the PH of the recipe making it compromised as a water bath recipe.

Your turn. Share your experience, questions, fears and successes. That is how we encourage and inspire others!

Friday, June 5, 2015

Let There Be Light- Pruning Tomatoes


prune-
-trim (a tree, shrub, or bush) by cutting away dead or overgrown branches or stems, especially to increase fruitfulness and growth; cut away (a branch or stem); reduce the extent of (something) by removing superfluous or unwanted parts.

A terrifying thing, cutting away at something. Despite the fact it is for the best, many of us are reluctant to chop and hack at things in our lives- especially a plant we have worked so hard to grow. This week I embrace the blade and take to the rows!

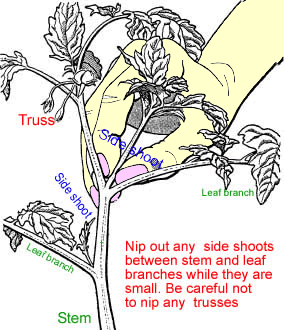
Tomatoes are, for the most part, vines that grow and sprawl everywhere. Left to themselves, they can grow over 6 feet tall and completely swallow a garden bed. I prefer to keep my plants a size I can handle; besides, we want the fruits not a messy tangle of leaves! Let's look at what I whack away. 1. 

1. Any side shoots. Side shoots pull nutrients and energy from the plant (thus the term 'suckers' is often used). I pinch or snip them when they are the size of my small hands. 
2. All leaves near the soil. Plant parts touching the soil are a venue for disease and pests. My tomatoes are pruned to the first fruiting. 
3. All but three main stems. I want the plants to produce healthy, hearty fruit, so I keep the plant a bit smaller to allow its energy reserved. This also helps air and light circulation.
4. Excess leaves or diseased/damaged leaves. Sometimes when you look at the plant, the tomatoes are not visible for all the bushy leaves. I trim away any leaf branch shading the fruits and preventing air and light. During the recent rains, this has been vital to slowing vine rotting fruits. It also helps with pest control (less habitat). 
All this and I must say, pruning is not an exact science. For example, in seasons of intense heat we need a bit of shade for the fruits to prevent sun scald. In that (usually late July, early August for me) I leave some leave cover, but keep that air flow going. 
My entire week has been traveling from one garden to another teaching pruning and care as well as working to prune and maintain my own. Gratefully, it seems to be helping- for today as I visited one of our gardens the tomatoes were showing the first blush of red! Grateful for the sun and a little trim, maybe we will have a healthy tomato harvest after all. -Green tomato salsa just isn't as tasty as the red!

Wednesday, June 3, 2015

Clearing the Mess- June's Garden


The theme for June's garden is- mud. Raised rows, raised beds, even our mobile gardens are simply saturated and standing in mud. Any break in the downpours will find me slogging out to the gardens to baby the surviving plants and harvest whatever they offer me.

This particular week seems to offer a bit of sun, which means mosquitoes, mud and rot. Plants that have been severely water logged now face searing sunlight causing fungus, mildew, and death. Each day my goal has been to work one garden location (I have 3 home gardens, an education garden, and several school/community center gardens to tend).

Hanging in there: herbs, tomatoes, some squash, peppers, a couple eggplant, and believe it or not the green beans. It is a struggle to remove diseased leaves and aerate the soil as much as possible. Some growth is stunted, but they aren't dead, so we will give them a shot.

Berries are busy and green; mine seem to have delayed ripening, most likely due to lack of sunlight. Let's hope they get enough this week to harvest soon.

Many of the fruit trees, peach, nectarine, and citrus, dropped their fruits and blossoms during the severe weather. Winds that topple trees often toss the unripe fruits and blossoms right off.

Today I press forward: several beds cleaned and cleared, several more to go. In the empty spaces we did seed some okra; some we simply covered for fall. 

Tuesday, June 2, 2015

Poultry Harvest 2015


This year brought quite a few challenges to our homestead- many of which have a profound effect on our food production. Heat was the first obstacle partnered with some shipping mishaps which left us with half the birds we normally process in a year's time. This was followed by severe flooding that left us standing in water searching for higher ground.

Challenges are good for us- even in urban farm/homesteading. Times like this force us to think outside the box, evaluate every option we hadn't thought of, and press on. The flock didn't suffer to terribly once we found a dry place for them, and the year's butchering day went off without incident. In all, we processed about 50 birds in 3 hours despite the fact there are only 3 of us here to do the work (in the past there were 5-7 people on hand).

My family tends to give me plenty of space on days like these: I am task oriented, focused and rather intense about set up, process and the generally running  of it. Over the years, our family members learned each aspect of the process, but eventually found their place in the line up.

Fans set out, freezer's cleaned and prepped- I tend to 'fast' my flock the night before: the have water but no feed. This cuts mess and the birds seem calmer. My butcher set up has three stations: catch and kill, cut and cook, burn and bury. That's it. Note: we do not leave skin on our birds, so there is no plucking station.


My station is cut and cool where tables are set up and covered with paper. Trash bins are double lined and tucked under those tables. I have aprons specifically for butchering. Knives are specific to me as I have very small hands; I like them sharp and light weight. On one side of the table is a tub of water for 'quick rinse' needs (hands, knives, etc.). The other side of my table has a tub of icy salt water for rinsing the meat before packing. This cools the temp and helps draw the blood from the meat.
 

Bags of ice go into chests near the table. The rinsed and packaged meat will be chilled here before it goes into the freezer. This prevents the freezer temp from plummeting and the meat not cooling quickly.


Once meat is well chilled, the bags are layered in the freezer: layer of ice, layer of meat, layer of ice, etc. My family will tell you I am a bit nuts about cleaning and cooling quickly- but they have not gotten sick from any of our meat (just saying).

Today I sit with a sigh of satisfaction knowing the freezer is stocked and the heifer will be joining in very soon. Though it is not the usual harvest, it is a good one. We can always raise another set in the fall. We are all just glad to have a whole hunk of chore time cut out!